 TECHGUIDANCES
You cannot make every piece of data about your application public. Therefore, you need to set clear boundaries, defining who should access what components of your application and data. And that’s where the aspect of access control and permissions come in. Managing access and permission in Mendix applications is a critical exercise. It ensures that only authorized persons have accounts and are granted minimal permission, only enough to perform their roles.
For instance, only a specified user can update specific data. The idea behind managing access and permissions in Mendix solutions apps is to minimize the risk of information being corrupted, damaged, or stolen. So, users have access rights to the functions they should perform and nothing more. So, how do you manage access and permissions in Mendix apps? Let’s find out.
How to Manage Roles and Permissions in Mendix Apps
Roles and permissions are crucial parts of security. They provide a mechanism to limit access to different components of your application, including microflows and pages. Here is an in-depth guide to managing roles and permissions in Mendix apps:
Security Overview in Mendix
Since roles and permissions are under security, let’s start by understanding how to enable your app’s security.
Whether security is enabled for your Mendix application by default relies on whether it has been enabled in Mendix Studio Pro and its configuration settings. You may encounter several cases, including the following:
1. Your application Security is Off in Studio Pro
If you encounter this scenario, you haven’t enabled or configured security to be active in Studio Pro. You can enable security by clicking “App Settings” and opening “Roles and Permissions.” After that, click the “Enable Security” button to secure your app. Alternatively, you may be requested to enable it when you attempt to publish the application.
Upon enabling security, it is activated throughout the whole application. Therefore, there will be changes and checks applied to the application model. These changes will be visible in Mendix Studio Pro.
2. Security is Established to the Production Level in Mendix Studio Pro, and Settings Adaptable with Mendix Studio
In such a scenario, you view and modify Roles and Permissions in Studio. So, it won’t be an issue as you can grant access roles and permissions to your application.
3. Security is Set to the Production or Prototype/Demo Level
In this case, settings are incompatible with Studio. Therefore, you can only view but not modify Roles and Permissions in Studio.
Managing Roles and Permissions in Mendix Applications
Having discussed what each scenario means, let’s dive deeper into managing roles and permissions. A role is a series of permissions assigned to a user. For instance, you can grant an Administrator full access rights to all microflows and pages. For other users, you may only give access to specific pages while restricting access to microflows.
Mendix apps developed through the Developer Portal have two application roles:
- User
- Administrator
When you enable security, these two application roles will fully access your Mendix app. Also, when you create a new page, microflow, or workflow, Mendix Studio default permissions are established for them, implying that all existing roles in your application will access the newly created document. Therefore, we recommend examining and reviewing permissions for that specific document.
The Roles and Permissions page has 4 tabs:
- Roles
- Page Access
- Workflow Access, and
- Microflow Access
The Roles tab highlights all roles and outlines the number of microflows and pages these roles can access. The other 3 tabs have a table where all pages, microflows, and workflows are listed in rows while the roles are presented in columns.
Here, you can permit specific roles to access a page, microflow, or workflow by selecting the appropriate box to allow access for a role. If you want to select or deselect all workflows, microflows, or pages, click the “More Options” icon beside the user role. Doing so gives you a matrix specific to each role, as shown below:
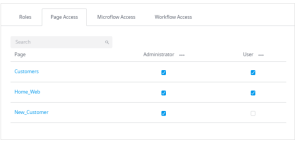
Source: Mendix
Since access and permissions in Mendix apps are granted based on user roles, let’s look at managing these roles.
Creating a New Role
To add a new role to your Mendix application, perform the following actions:
- Click Roles and Permissions and tap the Roles tab
- On the top right of your screen, you’ll see an Add Role icon – click it.
- Set the name of the new role in the dialog box that pops up and tap Create. Doing so will create a new role.
Modifying Existing Roles
To modify an existing role, perform the following actions:
- Click the Roles tab once you’ve opened Roles and Permissions
- Tap the More Options icon (ellipsis) and choose edit
- In the Edit Role pop-up, update the changes you want to make and click Save. This role will be edited successfully.
Deleting Roles
To delete a no longer needed role (say an employee who quit), perform the following actions:
- Click the Roles tab in Roles and Permissions
- Click on the More Options icon and choose Delete
- Click the delete icon on the pop-up dialog box to confirm the deletion. The role will be deleted. However, you cannot edit or delete the Administrator role.
Granting Access to Specific Pages, Microflows, or Workflows
There are two approaches to modifying access for specific pages/microflows/workflows in your Mendix application:
- Setting Access Via Roles and Permissions
In this case, perform the following actions:
- Open the Roles and Permissions function and click on the Page/Microflow/Workflow Access tab, depending on the component you wish to grant access to.
- Look for the user role in the column, tick the radio button next to the page Page/Microflow/Workflow to grant access, and untick if you wish to restrict access.
- Setting Access Via Properties
To grant access to a Page/Microflow/Workflow through its properties, do the following:
- Open the Page/Microflow/Workflow you wish to grant access
- Go to the Properties tab, move to the Permissions section, and tick or untick Allowed Roles to set or restrict access.
Final Thoughts
Managing access and permissions in Mendix applications is one of the primary strategies for securing your app. It ensures that only authorized persons access specific components of your applications, including pages, microflows, and workflows, depending on their roles. Mendix provides a straightforward solution for managing access and permissions in your app through its Roles and Permissions function.